Tuesday, March 17, 2009

One Shortcake for the Highest Bidder. Garbage?! Where did you get a paddle?

How fun does baking a cake on a Saturday night while all of your friends are out having a gay old time sound? Fun, right? And did I look like some what of a loner as a roamed the aisles of Sobeys' at eleven o'clock at night in search of a pastry blender? Perhaps. But have you ever tried to make a two layer strawberry shortcake? I never really thought that the idea of baking my own cake, from scratch, would enthrall me enough to stay in, specifically to bake this cake, and miss a night of unnecessary drunkenness. Well, it did. And the results weren't satisfying, but I learned some key pointers that every new chef should experience on their own.

Strawberry Shortcake

Ingredients

3 pints fresh strawberries
1/2 cup white sugar
2 1/4 cups all-purpose flour
4 teaspoons baking powder
2 tablespoons white sugar
1/4 teaspoon salt
1/3 cup shortening
1 egg
2/3 cup milk
2 cups whipped heavy cream

Directions

Step 1: Slice strawberries and toss them with 1/2 cup of white sugar.
Step 2: Preheat oven to 425F and grease one 8 inch round cake pan.

Step 3: Combine flour, baking powder, salt, and 2 tablespoons of white sugar in a bowl. With the pastry blender, cut in the shortening until the mixture resembles course crumbs
Step 4: Make a well in the centre of the mixture for beaten egg and milk. Stir until just combined.Step 5: Pour the mixture into the prepared pan and bake for 15 to 20 minutes. Let the cake cool in pan.Step 6: Slice the cake into two layers. Top one layer with whipped cream and prepared strawberries. Place second layer on top and cover with remaining whipped cream and strawberries.In theory, this cake should have been delicious. Just thinking about the combination of caramelized strawberries, swirls of whipped cream, and a sweet, crumbly cake was enough to make my mouth water. In the end, however, the only worthy mouth of this cake was the garbage. First, I must stress how important it is for a new cook to follow the given directions. I started to read the comment section underneath the recipe and almost all of them said that they reduced the amount of baking powder from 4 teaspoons to 2 teaspoons. Since the general consensus was that the cake turned out better will less baking powder, I decided to follow the crowd. Well, my cake never baked. I sat in front of the oven for nearly an hour and after deciding that four times the recommended baking time was enough, I took out my still raw cake. This left me with two choices: I could abort the cake baking mission or I could try again, following the instructions to the T. This time around, I did everything the recipe told me to and the cake came out fine. Now that I had convinced myself to follow directions exactly as they were written, I came to my next problem, which was in the form of whipped cream. All the recipe said about whipped cream was that I needed 2 cups of it. So I bought a container of whipping cream and used a beater to turn the liquid cream into a solid form. My mom told me that I should probably add sugar to the whipped cream or else it wouldn't be sweet, but the recipe never said anything about sugar in the whipped cream, so I didn't do it.

The end product of this cake was less than desirable. In total, I had two bites of cake. The first bite, including cake, whipped cream, and a strawberry, was not terrible but it wasn't anything to die for either. The second bite, on the other hand, lacked a strawberry and left a rather regrettable taste in my mouth. Unfortunately, the cake sat in the fridge for about two days before it made its rightful way to the garbage!

Monday, March 9, 2009

Fruit and Nut Salad...by Yours Truly

Standing in my kitchen comes with a new found sense of confidence. The confidence that allows me to offer to make dinner to three always hungry, always eating men. The confidence that allows me to glide through the grocery store as if I have been there millions of times before. The confidence, finally, that allows me to think up a recipe of my own! It doesn't take a chef extraordinaire to make a salad- all you have to do is combine a few of your favourite ingredients and voila, lunch!

Fruit and Nut Salad

Ingredients (these ingredients are for a single serving salad, to my liking!)

1 cup strawberries
1/2 Royal Gala apple
1/2 cup Swiss cheese
1/4 cup Cashews
1/4 cup Red onion
2 cups Baby Spinach
Balsamic Vinegar
Olive oil

Directions

Step 1: Wash and cut Strawberries and 1/2 apple into quarters and cubes, respectively.
Step 2: Cube Swiss cheese.
Step 3: Slice onion into longer-length pieces.Step 4: Chop cashews (Either by hand or with a food processing device)
Step 5: Mix ingredients together and dress with Balsamic vinegar and Olive oil to your tasting!
As you can tell by the directions, it is a very simple recipe to follow. I found the most difficult part was measuring out the amount of ingredients I needed. Usually, if you are going to make something this simple just for yourself, you can probably just eye out exactly how much of each ingredient you want. Recipes like this are great to be modified by your mood or your taste. If you don't like cashews, maybe try slivered almonds or pecans. And I learned something new on my "own recipe" adventure. Can you just imagine me shuffling around drawers and cupboards and suddenly I come across all these funky tools that makes me think "I wonder what this thingamajig here is for" and then I proceed to cut myself on the sharp zig zag blades that I thought was freakin' awesome? Well, now that I am comfortable in my kitchen, I found out that that thingamajig is a very handy food chopper that chopped my cashews into perfect, little pieces.

I would highly recommend my fellow new chefs to try out a recipe of their own. You might just be surprised at what you can think up!

Sunday, March 8, 2009

Ole! (snap, snap!)

Many of you might be familiar with the Christian tradition of Lent. Every year, for as long as I can remember, I've given up some form of food, ranging from chocolate and chips to cucumbers(I love, love, love cucumbers, in case anyone thought that was weird). Lent lasts the 40 days from Ash Wednesday, which fell on February 25 this year, until Holy Saturday, which falls on April 11, 2009. And every year, for as long as I can remember, I have not once completed the 40 days with out eating said food. Well, this year I decided it was going to be different, and for once, I would follow up on my word. I decided to give up meat- I am not a big meat person but, not being able to eat something that is the primary food group in your house, I'm thinking is going to be hard. Technically, I haven't given up all meat since I still eat fish (mostly tuna and salmon), but I have stopped eating chicken, beef, pork, lamb etc. This being said, just be prepared for a meatless theme in my future recipes!

7 Layer Meatless Tortilla Pie

Ingredients

2 (15 ounce) cans pinto beans, drained
1 cup Pace Picante Sauce
1/4 teaspoon garlic powder
2 tablespoons chopped fresh cilantro
1 (15 ounce) can black beans, drained
1 small tomato, chopped
7 (8 inch) flour tortillas
2 cups shredded Cheddar cheese

Directions
(these are the directions I thought I read... follow the linked recipe for actual directions!)

Step 1: Mash drained pinto beansStep 2: Stir in 3/4 cup picante sauce and garlic powder

Step 3: Mix in black beans, tomatoes, and remaining picante sauce
Step 4: Preheat oven to 400F

Step 5: Place on torilla shell on baking sheet. Top with 3/4 cup bean mixture and 1/4 shredder cheddar cheese. Repeat until all 8 shells are used.Step 6: Cover with foil and bake at 400F for 40 minutes
Step 7: Cut into wedges and serve.

Alright, so who wants to hear another story about how Alex thought she read the directions correctly, but in reality, missed a few key steps? As per usual, I read over the directions and assumed that I knew exactly how to make the bean mixture. First of all, I poured in the black beans with the pinto beans, a step not in the directions, which resulted in me having to pick out the pinto beans one by one. I then proceed to question the directions as to why I would first pour in 3/4 of the picante sauce if I was just going to mix in the remaining 1/4 cup with the other ingredients. Well, turns out there was supposed to be a pinto bean layer with cheddar cheese and a black bean layer with cheddar cheese. My 7 layer pie had one type of layer- black bean and pinto bean mixed! It's all going to the same play anyways, right? Now, I did not include the cilantro, because I don't like it, and I only used mild taco sauce instead of the picante sauce. If I have learned anything from cooking, it is that when you remove or change ingredients, you also remove or change the taste of the dish. Suffice it to say that the 7 Layer Meatless Pie was a not very tasty. I plopped on some sour cream, which added some taste, but then I added some medium salsa which just took it to a new level. As with all cooking, it's the personal touch I gave to this dish that made it all the more delicious!

Sunday, February 22, 2009

When the Moon Hits Your Eye...

Well, if I didn't know exactly how hard cooking was, I certainly do now. I had my genius idea to bake up a nice Greek Vegetarian Pizza as a nice surprise for my family. But before I begin my step by step directions, I would like to caution my fellow beginner cooks not to make your own dough. The recipe seemed simple enough- 1 cup of all purpose flour, 1 1/2 teaspoons of baking powder, 1/2 teaspoon of salt, and 1 cup of hot water. This simple dough recipe ended up in an impromptu-mid preparation-oven on trip to the local grocery store!

Greek Vegetarian Pizza

Ingredients

1 (12 inch) pre-baked pizza crust,
1/2 cup prepared basil pesto
3/4 cup sun-dried tomatoes packed in oil
1/2 cup sliced black olives
3 cups torn spinach leaves
1/2 red onion, quartered and thinly sliced
1 cup crumbled feta cheese
2 teaspoons dried oregano
1 tablespoon olive oil
2 tablespoons grated Parmesan cheese

Directions

Step 1:
Preheat the oven to 450F/ 230C

Step 2:
Place dough on baking sheet and spread into 12" pizza crust


Step 3:
Spread pesto onto pizza crust. Top pizza in the following order: tomatoes, spinach, red onion, black olives, feta, and oregano

Step 4:
Bake until spinach starts to wilt and cheese starts to brown. About 15 minutes

Step 5:
Remove pizza from oven. Sprinkle with olive oil and Parmesan cheese

Step 6:
Slice and Enjoy!

I must have sorted through at least 10 different recipes in order to find one that I thought I could manage. The directions, as you can see, are not too hard to follow and the ingredients preparation was a snap. However, making a pizza with no help, well my little brother was here laughing through my endeavour, I was not exactly sure when I was to take the pizza out. The directions instructed me to leave it in for about 15 minutes, but after about 45 minutes, I still didn't know if it was cooked thoroughly. I baked the pizza for a total of 50 minutes before I took it out. But to my surprise, my pizza was a hit! Besides the fact that I don't like sun dried tomatoes, the pizza was very tasty. Of the five people who live in my house, including myself, my pizza got a rating of 3.5 out of a possible 5 stars. That's amore!

Oh, I almost forgot to show you MY pizza dough...

Yeah, that whole spinning the pizza in the air idea just didn't work out!

Friday, February 20, 2009

Rapini...just like cooking: An Acquired Taste

I don't know if anyone even noticed, but the introduction to my last post was written in past tense. You see, my Dad is newly retired and has decided that he too would like to take on the challenge of cooking! So, for a nice family dinner we decided to make an Italian pasta dish. The main ingredient was rapini. Although rapini is a good source of Vitamins A, C, and K, it has a very distinct taste that may not sit well with all pasta connoisseurs.

Pasta with Rapini

Ingredients
1/2 cup olive oil
4 large cloves garlic, minced
2 pounds rapini (broccoli rabe)
Salt and pepper to taste
2 tablespoons balsamic vinegar
1 pound medium-sized pasta
Crushed red pepper (optional)
Freshly grated Parmesan cheese

Directions

We strayed from these directions on the website because after talking to may aunt, we learned of the way my grandmother used to make this dish. First, we got out a big pot and filled it to about 3/4 with water and added in the cut rapini (you know you have enough water if the rapini is submerged completely). Then we placed the pot on medium heat to boil. As the pot was boiling, in a separate pan we heated the 1/2 cup of olive oil over medium heat. Instead of mincing the garlic, I remembered the garlic press my mom always uses for her pasta sauce and so we used that to save us some time. In the heated pan, along with olive oil, we combined the pressed garlic, salt and pepper, and balsamic vinegar. That mixture, after turning down the heat, just sat on the stove to simmer. The water came to a boil and so, in went a box of penne. So now, the pasta was cooking in the same pot as the rapini. If you've ever cooked spaghetti before, you may know the trick-if you throw a sting of spaghetti and it sticks to the cupboard, it's ready- however, this trick does not work with penne (I learned by continuously throwing a piece of penne, that would not stick, at the cupboard as my dad fervently looked on). So instead, I just ate piece of penne and decided it was cooked. As we strained the cooked penne and rapini, we saved a little water to be used for the sauce. In a large bowl, we put the penne and rapini, and covered the pasta with our olive oil mixture. Not everyone in our house enjoys spicy food, so we served the chili peppers as well as the Parmesan cheese on the side!

Every new dish I cook seems to come easier and easier. I'm now looking forward to cooking more complex recipes with a little less help from others!

Tuesday, February 10, 2009

Barbecuing: A Man's Domain?

I grew up in a household which may not be too unfamiliar to many other people. My mom was in charge of the kitchen, meaning she cooked pretty much every meal that came out of that room. My dad, on the other hand, was the "barbecuer." He prepared the meat and took it outside to the grill. Personally, I've never really understood how barbecuing is seen to be a man's job. Let's look a bit further, shall we.

The term "barbecue" has no exact origin, but most scholars agree that it is a derivative of the West Indian word "barbacoa," a method of slow cooking over hot coals. For a more extensive reading on the etymology of the word "barbecue," visit this graduate paper. Next, come in the manly men. According to The Independent UK, a character trait called "The Flintstone Factor" is the reason men feel the need to be in charge of the barbecue. The article goes on to state that "a hidden primeval instinct as a caveman hunter-gatherer makes [men] seize control of the barbecue.." Another psychologist, Dr. Aric Sigman, concludes that a barbecue is one of the few opportunities left for a man to "satisfy his love of gadgets and to recreate the cave-side ritual" (Barbecue Survey: Calor).

So let's see where we're at. Men love barbecuing because it brings them back to prehistoric times and it also allows them to fool around with tongs and propane tanks. Ok, well now we have the perspective of a man, let me give this barbie a try!

Jenny's Grilled Chicken Breasts

Ingredients

4 skinless, boneless chicken breast halves
1/2 cup lemon juice
1/2 teaspoon onion powder
Ground black pepper to taste
Seasoning salt to taste
2 teaspoons dried parsley

Directions

Before I give directions on how to grill up these chicken breasts, I'd like to share my first barbecue experience. Well, it was just this past summer that my brother got the bright idea that we should barbecue up some steaks. I don't even like steak all that much, but hey, we were hungry and bored. So, my brother defrosts the steaks and starts seasoning them as he instructs me to go turn the barbecue on. I have never turned a barbecue on so I kindly ask him to instruct me and he replies, and I quote, "turn the propane on, turn both dials to, like, 9 o'clock, and then turn the ignitor." Alright, I go to the barbecue, turn the propane on, turn both dials to, like, 9 o'clock, and then pause. At this point, I was a little bit scared that a big ball of flame would come shooting up once I turned that ignitor. Don't you hate it when you're right? Luckily, as I turned the ignitor, I also turned my face away. The barbecue successfully singed all the hair off of my right arm. In case you were all worried, I started the barbecue.

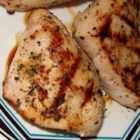
But I digress. I combined all of the ingredients into a seal-able bowl. I shook the bowl to mix the ingredients and then let the chicken marinate for about 20 minutes. In the mean time, I went outside (opened the garage door and put the barbecue at the edge) and attempted to ignite the barbecue once again. Just to make sure everything went well, I asked my Dad to give me instructions for the barbecue. His instructions were pretty much the same, except, he told me to turn the dials to 3 o'clock. Big difference! When the grill was hot enough, I placed the four chicken breasts to cook. The directions said to grill 10-15 minutes each side, or until no longer pink and juice runs clear. I, however, just kept flipping the chicken breasts because I had a handy meat thermometre!

In case I hurt anyone's feelings, here are some pictures of really awesome barbecues!


Images from Life in the Fast Lane

Tuesday, February 3, 2009

Super Brownies

My friends and I got together for a little Superbowl "party." This party consisted of a variety of chips and chip dips, talking during the first 7/8 of the game, and then, of course, we watched the final two minutes of the game because God forbid we didn't see who won. Oh, and the most important part of our entire night were my made-from-scratch deep dish brownies!!

Deep Dish Brownies

Ingredients

3/4 cup butter, melted
1 1/2 cups white sugar
1 1/2 teaspoons vanilla extract
3 eggs
3/4 cup all-purpose flour
1/2 cup unsweetened cocoa powder
1/2 teaspoon baking powder
1/2 teaspoon salt

Directions

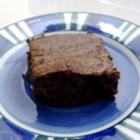
Well, first of all, I baked these brownies in the foreign kitchen that belonged to my friend, Andrea. I thought I had a pretty efficient oven/stove, but I was introduced to stainless steel heaven. I swear it had a button for everything you could think of, every baker's dream, no doubt! I typed in 350 degrees and the oven began to preheat. I neatly aligned all of the ingredients that I brought to make these brownies. On a side note, you think that shopping for a few common items at your local grocery store would be a breeze. I guess I encountered a wind storm because it took me 30 minutes to find THREE items I didn't have (cocoa powder, baking powder, and flour). Back to baking. I stared at the instructions for a good five minutes to make sure that I was going to do everything right, since this was the first thing I've ever baked. I had two bowls: one large bowl and one medium sized bowl. The directions instructed me to combine the melted butter, sugar, vanilla, and eggs in one bowl and the flour, cocoa powder, baking powder, and salt into another. So, as I stood there, I was certain that I should put the egg mixture into the larger bowl and the powder mixture into the medium sized bowl. I was so certain in fact, that I argued with Andrea about my correctness and made a fool of myself as it turned out I was wrong. Oops! So I carefully blended the egg mixture with the powder. I poured the mixture into a greased 8 inch pan and placed it into the oven.

Now is it just me, or is the best part of baking brownies licking the bowl and spoons clean? We all huddled around the bowl and seriously licked every last drop of chocolaty goodness. I was a little bit preoccupied with my baking brownies though. The instructions told me to bake for 45 minutes. I was up in the kitchen every two and a half minutes to make sure nothing was burning. After the 45 minutes, I used the old toothpick trick (stick a clean toothpick into your baked goods and if it comes out clean, then it's ready) and decided to take them out. By this time, there was the most intoxicating aroma in the house that we didn't even wait until the brownies cooled. Surprisingly, my brownies were delicious, a little gooey inside and crisp around the edges. I'll give myself an A+++

Sunday, January 25, 2009

Smalltown Home Cookin'

Since I tried, and failed, at the intricate salad recipe by Curtis Stone, I figure I should start some where a little bit easier. In comes Paula Deen. Deen is famous for her comfort food recipes from the South and with a glance at her website, Paula Deen Online, I notice she has a recipe section that is "Kid Friendly." Well, technically, I am no longer a child, but I'm thinking that this will be a great place to start.

Cheesy Broccoli Bake

Ingredients

1/2 lb softened cheese product
10 3/4 ounce can condensed cream of mushroom soup
8 ounce can sliced water chestnuts
2 tablespoon butter
1/4 cup chopped onion
1/4 lb fresh mushrooms, sliced
1/4 cup chopped celery
2 lb fresh broccoli, trimmed and cut up
1/2 teaspoon garlic salt
1/4 teaspoon pepper
1 cup grated cheddar cheese


Directions


Preheat oven to 350 degrees.

Steam broccoli for 10 minutes. In the meantime, saute celery, mushrooms, and onion in butter for 10 minutes; drain.

Combine broccoli, saute mixture, and water chestnuts. Heat soup and softened cheese product in saucepan over low heat until cheese melts. Pour over broccoli mixture. Add garlic salt and pepper and combine.

Place in greased casserole dish. Bake for 20-25 minutes. Sprinkle top with grated cheddar cheese the last 5 minutes of baking.


Result


Well, I did it (ahem, my mom helped me, ahem)! It wasn't as hard as I thought it would be. I had to make some minor changes to the recipe. I didn't use water chestnuts and also, since I didn't know what "softened cheese product" was, I used cheddar cheese. I was in charge of the ingredients preparation and my mom and I both did the sauteing and baking. The final product was actually impressive. Although the dish was very rich and cheesy, it was tasty nonetheless.


Recipe courtesy of Paula Deen

Take Home Chef. Curtis Stone.

Everyone, meet Curtis Stone. He may be familiar to you from the popular TLC show, Take Home Chef. Well if not, let me tell you a little bit about him and his cooking styles. Stone hails from Melbourne, Australia where he began his cooking career at the age of 18 at The Savoy Hotel. After developing his qualifications as Chef in Australia, he ventured out into Europe to seek cooking advice from the world renowned Chef Marco Pierre White. It was with White that Curtis Stone gained most of his expertise and popularity in the culinary world. Stone started at The Grill Room with White himself. From The Grill Room, Stone became Sous-Chef at Mirabelle restaurant. While Stone was cooking here, the restaurant was awarded a Michelin Star (fyi...the Michelin Guide sparingly awards restaurants 1, 2, or 3 Michelin Stars: 1 being a very good restaurant, 2 being excellent cooking, and 3 being exceptional cuisine). After gaining White's respect as a Chef, Stone became Head Chef of White's critically acclaimed restaurant Quo Vadis. After 4 years at Quo Vadis, Curtis Stone gained his celebrity through a book offering which led to television shows, books, and of course loooong waiting lists at his restaurants.

Although I don't know very much about cooking, I do know that I value fresh ingredients being used in my foods. One of Stone's trademark cooking principles is that "If you get your hands on good ingredients and treat them properly, you don’t need to do much." This principle is present in many of his recipes. Just by grazing through a few of his recipes, I noticed that he likes to make everything fresh--ranging from croutons, to raspberry puree, and even horseradish. There is no overload of preservatives or seasonings in any of his dishes because the ingredients themselves should provide the taste for the meal.

So I decided to try and make one of Stone's salad recipes. If I could only eat one dish for the rest of my life, I would definitely choose salad. There are so many possibilities for a salad it's just crazy. Anyways... I chose to make Stone's Salad of Baby Spinach, Crispy Bacon, and Cheese Croutons (you can find the recipe and method here!) At first, it seemed so simple...honestly how hard is it to rip up some lettuce or whatever it is you do to the lettuce. With the exception of the grape seed oil and specified sour-dough bread, I had all of the ingredients for my salad. I begin reading the instructions, "Preheat the oven to 400F/250C." Crap. I know how to use the oven, I think, but it's telling me to "ensure [the bread pieces] are evenly cooked" and I don't think I'll know when they are "evenly cooked".

I decide that I've started to run before I could even crawl, so instead, I mixed that baby spinach with some French dressing. Mmm Mmm, not so good.

Monday, January 19, 2009

I Can't Cook

Like most other 20 year olds, I eat. "Okay..." you may all be thinking, well let me explain. I am taking a class this semester, Advanced Composition Theory and Practice: Theory and Practice of Blogging, that requires me to create my own blog. Our professor informs us that it can be on anything that we are authorities of and also, that it must relate to other people. So I am at home staring into a refrigerator full of food as I think about what I could possibly write a blog on. Just standing there, I imagine someone else. They pull out the yams, the chicken breast, even some parsley (who uses parsley, anyways.) They grab seasoning and spices and pecans. They move to the counter and whip up a gourmet lunch. Can I do that? NO, I answer myself out loud. I close the refrigerator door as it occurs to me, I really cannot cook. Minus the Kraft Dinner and the Eggo Waffles that I have mastered, if it doesn't come from a box, I probably can't do it.

So now that I have reached this depressing conclusion, I have an idea for a blog. Since I cannot cook a fresh meal, I will be following some acclaimed and also up-and-coming culinary artists and some of their cooking styles. In order to teach myself how to cook, I will be trying out some of their most popular recipes and sharing my trials with you.

So do I eat? Yes. Can I cook? Pretty soon!